Showing posts with label Gingersnap Creations. Show all posts

Wednesday, 10 November 2010

Gingersnaps - Notions challenge


Gingersnaps challenge this week is 'Notions' and here is my contribution. It's an altered tin to keep my 'special' buttons in - all the lovely vintage ones that are really too nice to use!
Here's what I did:
1) My tin was silver so I first coloured the areas which would be seen with gold Krylon pen.
2) I then used gel medium to adhere a torn scrap of old yellowed sewing pattern tissue to the lid.
3) I stamped the Hero Arts stamp (Simple Handmade set), trimmed, tearing one edge, and sponged with Antique Linen.
4) I stamped the dress form and label (7 Gypsies) onto Basic Grey Basics paper, cut out and added. I coloured the base of the dress form in pencil to match.
5) I embellished the tin with buttons tied with Stampin' Up linen thread, crochet trim, a tape measure cut from Cosmo Cricket paper (thank you Nix!) and MM letter stickers.
I hope you like my example and will play along with our challenge. Thanks for stopping by :)
Katy xxx

Wednesday, 13 October 2010

Gingersnaps Challenge - Versamark

Here's my contribution to this week's Gingersnaps challenge. The theme is Versamark and I've actually used three different Versamark techniques here:

-Watermark - the background text (Prima) is simply stamped with Versamark onto the kraft card to create a watermarked effect.

-Chalk - the swirls are stamped with Versamark then chalked over in a slightly darker colour chalk than the kraft paper to make them stand out a little from the text

-Gilding - the heart is stamped with Versamark, Stamp 'n' Bond then gilding flakes applied.

Just a simple little card. Not very seasonal I know - might have to save it for Valentine's Day next year!!!

Wednesday, 6 October 2010

BOO! from Gingersnaps :)

Today's theme at Gingersnaps is 'Gothic Elements' - having read the description I may have made a slight misinterpretation of said theme as I went with Hallowe'en. However, I am happy with my creation - it's not very me but that's what I love about it! I've had this Grungeboard skull lurking about forever wondering what on earth I might do with it. I also finally got to try my Rock Candy Crackle Paint too to age and weather the skull.

Here's how I made it:

Ingredients:
Tim Holtz Masks: Haunted
Tim Holtz stamps: Slight Alterations
Inks: Dusty Concord Distress Ink; Stampin’ Up black ink; Memento Smoky Grey ink
Grungeboard shapes (skull)
White acrylic paint
Distress Crackle Paint: Rock Candy
Chipboard
Book pages
Thickers letters – chipboard
Black card
Die cut spiders
Thread
Scrap of ribbon


1 Cut chipboard into a coffin shape and paste book paper (I tore it to add texture) over the chipboard. Trim.

2 Place the masks down and ink over with Dusty Concord. Add black in places around the edges. Stamp the scratches stamp from the Tim Holtz set with black ink. Remove the masks.

3 Tone down the white of the spider webs with a touch of grey ink.
4 Paint the Grungeboard skull with white paint (I cut it into pieces so I could layer the bones behind the skull for dimension). When dry ink the edges and then paint with Rock Candy Crackle Paint. Allow to dry then rub grey Memento ink over to highlight the cracks. Add black card to the back to fill the eye and nose sockets.

5 Similarly paint/ink chipboard letters to spell ‘boo’. Add on a scrap of torn black card.

6 Finish with spider die cuts or plastic toy spiders, hanging one from the bottom on grey thread. Add a loop of black ribbon as a hanging.
I hope you join in at Gingersnaps :)

Wednesday, 8 September 2010

Gingersnaps challenge: Punches

Today's challenge over on Gingersnap Creations is punches. Although I don't have squillions of punches, I do use the ones I have a lot. Here I've used a circle punch and a border punch (Martha Stewart Doily Lace). I love to layer my punched borders like this and it's a technique I use lots.

I went for a bit of a vintage look, using soft colours for this simple card.

We hope you'll join in with this week's challenge - have fun!

Katy x

Wednesday, 18 August 2010

Gingersnaps day again!

This week's theme is 'Go 3D' - so I did! I made an altered bottle for my submission (it's actually an old bottle that was once filled with Prima flowers). The stamps I used are fairly recent ones from Crafty Individuals. Here's how I made it:

1) Drag a Tumbled Glass Distress inkpad over a piece of white card (measured to fit your bottle), creating a streaky background.

2) Then use a blending tool to apply Bundled Sage all over the card. This gives a lovely watery effect and colour.

3) While the ink is still wet, overstamp a flourish (CI-182) and the starfish using the same inks. The images will sink into the background a little and blur a bit because the ink is wet on wet.

4) Stamp the border in Timber Brown Stazon; add a wash to the shells with Pumice Stone ink and a water brush to highlight them.

5) Apply strong tape to the bottle and stick the card piece around. Wrap raffia around the top and bottom of the bottle and around the lid.

6) Decorate another piece of card as in step 1-3. Die cut a circle and tag from it. Stamp with a shell and seahorse from the CI plate. Stamp these images again, colour with inks and cut out. Layer onto first stamped images as shown.

7) Tie tag to bottle with sheer ribbon, and you're done!

Hope you like it - thanks for stopping by :)

Katy x

Friday, 13 August 2010

Gingersnaps tutorial - paint

It's my turn for a tutorial on Gingersnaps this week, and the theme is 'Paint'. If you want to find out how I made the backgrounds on these two cards hop on over to Gingersnaps blog for my full step-by-step tutorial. I hope it is useful.

Enjoy,
Katy x

Wednesday, 7 July 2010

Gingersnaps Challenge - Heat

Well, giving the recent UK weather, 'Heat' is quite an appropriate theme for Gingersnaps this week!

My offering for the challenge has a touch of the tropical and uses my new Tattered Angels Coastal stamp set (lovely big 12x12 stamp set, super yummy). The finished card is A5 size.

The colours are richer in real life but it was hard to get a good pic.

Here's the destructions as usual:

Materials...

Tattered Angels stamps: Coastal
Autumn Leaves: Borders
Distress Inks: Wild Honey; Spiced Marmalade; Fired Brick; Barn Door; Mustard Seed
Versafine Ink: Black
2" circle punch
Cardstock
Post-It Notes

Method:
1) Punch a 2" circle from a Post-It Note. Place bottom centre on a piece of card and ink the card using the Distress Inks (except Mustard Seed), starting with the lightest colour (Wild Honey). Add the inks in layers and blend the inks to create a graduated effect as shown.
2) Remove the mask and ink the sun with Mustard Seed. The go over the edges of the sun with Wild Honey. This is to give a blurred effect around the edge of the sun and blend it into the rest of the card.
3) Stamp the palm tree in black. Cut a piece of paper into a hill shape and, using the paper as a mask, blend black ink around the base of the card as shown. Cover up part of the sun to give the illusion it is setting.
4) Add a border and word. Mat and layer the card as shown.
Pop over to Gingersnaps to see what the rest of the DT created and to play along with our challenge :).
Katy x

Wednesday, 30 June 2010

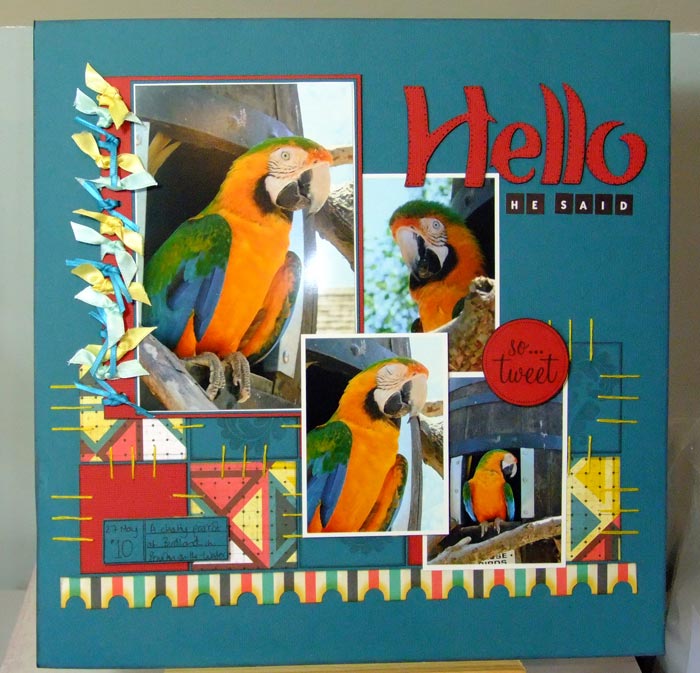
Parrot Fashion

A few weeks ago I had a lovely little getaway with some of the girls from my UKS team. A lovely bunch they are too. We had one or two classes during the weekend, and this layout is from a class by the lovely MJ (who runs Every Moment Matters). I adapted it somewhat, as MJs was a double page (I never do those) and I had more photos to fit on. However the brilliant touches with the stiching, squares and tied ribbon border are all courtesy of the lovely MJ :).

The picture is one of many from my visit to Birdland. Trust me you'll be sick of seeing birds soon enough!

Secondly, I've been CASEd in this week's challenge on Gingersnaps! I am feeling very honoured that two very talented ladies chose my work to emulate. Pop over to the Gingersnaps blog to have a look at what they did :).

That's all for now, thanks for stopping by.

Katy x

Wednesday, 23 June 2010

Gingersnaps Challenge - better late than never!

This is my entry for the Shades of Blue Gingersnaps challenge. I found this little drawer set in a pound store and it happens to be just the right size to hold the foam pads for my Inkessentials blending tool. I’ve altered it (appropriately) with Distress-inked panels decorated with a fab bird stamp from PaperArtsy.

Materials…
PaperArtsy Flora and Fauna 4
Technique Tuesday: Home stamps (frame)
Fancy Pants stamps (‘create art’)
Stamper’s Anonymous: Urban Tapestry (dotty texture)
Mini drawer unit
Gesso
Black and brown acrylic paint
Distress Inks: Tumbled Glass; Broken China; Faded Jeans; Rusty Hinge; Wild Honey; Shabby Shutters; Peeled Paint
Archival Ink: Coffee
Ink applicator or Cut-n-Dry foam
Water brush
Dymo and transparent tape (or use Safmat or rub-on letters)

1 Gesso the drawers then when dry paint with a layer of black paint then brown paint. Leave to dry.

2 Cut white card to fit the drawers and colour with all three blue Distress Inks. Stamp the dotty background around the edge in Broken China. Stamp the bird in Coffee ink and then stamp just the leaves from the bird around the edges.

3 Stamp the bird again three times and paint with the Distress Inks and a water brush. Cut out the leaves and birds and add to the inked panels. On the top panel stamp ‘create art’ left of the bird. Tape panels in place with strong tape.

4 Stamp the Technique Tuesday frame five times onto blue inked card, cut in half and stamp with the dotty texture and then the small branch as shown. Add a Dymo label to each panel and stick to the drawer fronts.

Hope you like it :). The other girls have made lovely stuff too, so do pop on over.

Katy x

Wednesday, 2 June 2010

Gingersnaps - Wings

Here's my entry for today's Gingersnaps challenge theme, which is 'wings'. Nice easy one this, so no excuse for not playing along!

My project is an altered noticeboard to hang in my craft room on which to write all my projects pending and notes to self (memory like a sieve...). I got the noticeboard for about £1.20 reduced in Morrisons supermarket. I forgot to take a picture of before, but trust me it was truly minging!

Of course although I made this over a week ago I am still waiting for OH to put it up for me... Why am I not surprised???

Here's how I made it in case you'd like to know ;).

Materials...
Prima frame stamps (sorry I don't know the name - they are frames and borders but I chucked the packaging)
Prima stamp: Notary (script)
Hero Arts stamp: Silhouette Grass
Tim Holtz stamps: Slight Alterations
StazOn Ink: Timber Brown
Distress Inks: Broken China; Tumbled Glass
Glimmer Mist: Gold
Brilliance Ink: Gold
Paper flowers
Cream and white card
Ink blending tool
Pearls
Chipboard letters (Thickers)
Krylon pen: Gold
White acyrlic paint

First of all, I sanded the inside edge of the original picture in the top part of the frame and then created a border with gold Krylon. Then I used a baby wipe to apply a wash of white paint to the wood. I then left this to dry. When dry, I stamped the corners with StazOn.

I coloured a piece of cardstock with the two blue Distress Inks then over-stamped with the Tumbled Glass using the Notary stamp and one of the Tim Holtz background images from Slight Alterations. With the Notary stamp, I inked in up really randomly in the middle of the stamp so I didn't get edges on the stamping (i.e. I stamped an incomplete image each time).

I then stamped the Silhouette Grass, varying the height so it didn't look too uniform. I followed this with the corners and butterflies from the Prima set.

I stamped the butterflies (including the ones on the corners) again onto cream card. After cutting out, I added them with Silicone glue so the wings are lifted as if they are flying off the page.

I finished by painting all the heads of wheat and butterfly centres in gold Glimmer Mist (this makes them catch the light but is still subtle). I embellished with pearls and paper flowers. Finally I stamped a border in gold and added the lettering along it.

I look forward to seeing your creations over on Gingersnaps :).

Katy x

Wednesday, 26 May 2010

Gingersnaps - burgundy, black and ivory

My entry for this week's Gingersnaps challenge. Follow the link to see what my talented teamies made with this striking colour scheme. The stamp is Penny Black and coloured with my fave Coloursoft pencils. The background is simply a piece of card Cuttlebugged (Textile Texture folder) and scrap of book page (a nod towards the altered book theme running through Gingersnaps this month).

Hope you like :). I love this poppy stamp muchly :).

Wednesday, 12 May 2010

Gingersnaps Challenge - Pencils

The theme for this week’s Gingersnaps challenge is ‘Pencils’. I have to say I absolutely love my Coloursoft pencils. I used to really dislike colouring in but since I discovered these it’s a joy! They really do blend effortlessly and the colours give excellent coverage, even on coloured card like the Kraft base I’ve used here.

For my sample this week, I’ve use the pencils in two different ways. Here’s what I did.

Ingredients:
Stamps: Inkadinkado Morphic Bugs
Cardstock: Kraft; brown; white
Coloursoft (or Prismacolor) pencils, Sansodor and blending stumps
Distress Ink: Brushed Corduroy
Archival Ink: Coffee
Corrugated card
Sequin waste
Mini brads
Papermania brad making kit

1 Stamp the bee (Inkadinkado) in Coffee ink onto Kraft card. Colour the body of the bee and the honeycomb using the Coloursoft pencils. Use two colours on the bee and blend. For the two circles at the centre of the images colour just around the outline with dark orange, then using the Sansodor and a blending stump, blend the colour from the edges to the centre using circular motions. This creates a lovely graduated effect.

2 To make the bee ‘pop’ colour over his body with dark brown and black pencils, blend with a fine pointed stump taking care not to muddy the yellow areas.

3 For the background panel, take three coloured pencils and randomly scribble them over a piece of white card. I used a less sharp pencil for the main colour (yellow) and a sharp one for the dark orange so the latter created more obvious lines. Go over the whole background with Sansodor (keep dipping so the application is generous). Add more pencil and blend again if required.

4 Sponge brown in through a piece of sequin waste in places to look like honeycomb.

5 Assemble card as shown. I stamped and coloured part of the bee again to make a co-ordinating centre for my brad and sprayed the strip of corrugated card with Glimmer Mist.

Why not have a go at these techniques for the challenge? Do pop over and see what the rest of the Gingersnappers made too – loads of inspiration awaits you!

Wednesday, 5 May 2010

Gingersnaps Challenge - Read

The theme for today's challenge on Gingersnap Creations is 'read'. Being a literal-minded sort, I've created a reading journal using my BIA for my contribution to the challenge. I love this stamp and I thought it appropriate as she looks like she is reading. I used up some Basic Grey paper I've had since the dawn of time, so that's another dent made in the stash mountain!

Materials...
Curious By Design stamps - Chere Amie
Stampendous stamps - Butterflies
Hero Arts stamp - Ledger
Elusive Images stamps - Curly Birds (flourish used inside)
Patterned papers
Chipboard pieces, 7 1/4 x 5 1/4 inches (covers)
Tim Holtz Idea-ology bookplate and brads
Letter stickers
Distress Ink: Barn Door; Brushed Corduroy
Versafine Ink: Black
Coloursoft pencils, Sansodor and blending stumps
Trim (Prima)
BIA and o-wire

Here's what I did:
1 Cover the chipboard pieces with paper leaving the reverse of the front cover uncovered until the after the bookplate is added later. On the front cover, add a panel of pink paper inked with Barn Door and with one corner rounded, and a panel of torn script paper inked with Brushed Cordoroy.
2 Stamp the girl (Curious by Design) onto a piece a plain Basic Grey paper and colour with pencils, blending the colours for a soft look. Round the top corner, ink the edges and add to the cover. Punch holes in the covers at this stage.

3 Stamp two butterflies, colour with pencils and cut out. Add along with the bookplate, trim and lettering as shown. Now you can cover the reverse of the front cover to hide the brads.

4 For the inside, stamp each page with the Hero Arts ledger stamp and the Elusive Images flourishes (or computer generate pages -believe me the stamping took an age!!!).

5 Bind the book and you are done.
I hope you like what I made - do pop and see what the rest of my lovely, talented teamies made and join in the challenge at Gingersnaps. If you don't want to make a journal, what about a bookmark or bookplate for this theme?

Katy x

Wednesday, 28 April 2010

Gingersnaps - Kraft challenge

Morning all!
It's Gingersnaps challenge day again - today the challenge is Kraft. Easy peasy for me, one of my favourite and most used colours.

I chose to make a mini album - I think Kraft is a perfect colour for seaside-themed creations. This 6x6 mini album will hold images of my holiday in Cape Cod. Confession time - I had planned to do a layout to show you here but I didn't get time....). I do wish life wouldn't get in the way of crafting - it's very inconvenient!!!

Here's how I made it:

Materials...
Card: Chipboard or mountboard sheet; Kraft cardstock; Blue Core'dinations cardstock; brown Bazzill cardstock
Stamps: Fancy Pants (swirls); ISC Picturesque (main image); Crafty Individuals (birds and small shell); Stampington Shore Cliff Elements (shell and starfish)
Inks: black Archival; Distress Broken China, Antique Linen, Faded Jeans; Memento Desert Sand, New Sprout; Versamark
Edge distresser and sandpaper
Chalk (Pebbles Inc)
Twine
Thickers letters
Distress Stickles: Antique Linen

1 Cut two covers from chipboard 6 1/2", cover with brown cardstock front and back.
2 Cut a piece of Kraft card 6" square and stamp with the flourishes (Fancy Pants) in Versamark, chalk over the Versamark in a tan coloured chalk. Distress edges. Cut a mat for this in sanded Core'dinations card and distress the edges of this too.
3 Stamp the Picturesque scene and colour with inks and a water brush. Stamp the birds at the top of the scene. Distress and add to the Kraft panel.
4 Stamp shells onto Kraft card, cut out and cover with Distress Stickles. When dry add using Silicone glue to get shape and dimension.
5 Assemble, adding with twine and letters. Punch holes for book rings. Decorate the inside covers with a stamped Kraft panel as created for the front. The pages inside are 6x6" Kraft card.
That's it - nice and simple :). Do go along to Gingersnaps and join the challenge!

Thanks for popping in!
Katy

Wednesday, 21 April 2010

Gingersnaps - botanical

The theme this week over on Gingersnaps is botanical. I've made a really simple card with a stamp from ISC - it's a single stamp and really large. The set is called 'Plumeria'. Beautiful image I think, so I kept it the focus and left the card unfussy.

Not much point doing a tutorial on this one - I think it's pretty self-explanatory. I coloured the flower with Coloursoft pencils. I coloured the largest flower twice and layered them up to add some dimension. A really easy and quick make but pretty I think.

Thanks for popping by,

Katy x

Tuesday, 13 April 2010

Another foil technique card

Here is another card I made using the foil background technique I demonstrated yesterday on Gingersnap Creations.

The stamps are ISC again - love their stamps!

Monday, 12 April 2010

Gingersnaps tutorial!

I've uploaded my first Gingersnaps tutorial today. The theme for this month is 'recycled supplies'. If you'd like to know how to make the background effect on this card, pop over to Gingersnaps for a step-by-step photo tutorial. Hope you like it!

Friday, 2 April 2010

Gingersnaps Debut!


'Home Sweet Home' is my very first DT project for Gingersnap Creations, the theme for which was ‘ginger, copper or rust’. I like those kinds of colours so that was a good start! I seem to be using a lot of corrugated cardboard lately (I use up the many pizza boxes my stash gets delivered in!) as I love the texture it adds. Plus it’s free!

I am going to try to post a short tutorial for everything I create over on the Gingersnaps blog so if you like any of my creations do pop over here for more information. I enjoyed making this, now just have to persuade other half to let me hang it somewhere - he is not exactly into the whole craft thing!

Materials…

ISC Tranquil stamps (bird and branch)
Hero Arts Branch Background
PaperArtsy script mini (MN61)
Memento Ink: Tangelo; Potter’s Clay; Rhubarb Stalk
StazOn Ink: Timber Brown
Cream acrylic paint
Red scrapbook paper (Basic Grey)
Corrugated cardboard
Alphabet letters (Cosmo Cricket and Basic Grey)
Bit of sponge
Twine

1 Cut a piece of corrugated card (mine is 7” x 5 ½”), tear off the top sheet to reveal the corrugations but leave some of the paper intact in places. Sponge with cream paint – wipe all the excess paint off the sponge so it is practically dry to get a light coverage which retains some of the colour underneath. When dry, stamp small portions of text around the edge in places to add a bit of extra depth. I use a bit of cheap bath sponge for this; no need to use up your expensive Cut-n-Dry for this type of painting.

2 Ink the background stamp with all three colours of Memento Ink and stamp onto cream card. Trim to size and distress and ink the edges. Stamp the branch on the lower portion. Stick to the corrugated card along with a piece of red paper.

3 Stamp the bird twice onto brown card in brown ink and cut out. Turn one of the birds over to get a mirror image so the birds face each other and ink it up with the brown StazOn so the colour tone matches the first bird. Add to the branch with 1mm foam pads. If I am using a solid stamp and cutting the image out, I always use colour on colour stamping (e.g. brown ink on brown card) – that way if my stamping is a bit ropey it doesn’t show anywhere near as much!

4 Ink up the letters ‘home’ with the brown StazOn and when dry (won’t take long) add them to the composition. Stick letters to spell ‘sweet’ onto a scrap of red paper and add that too.

5 Finally punch two holes and tie string through to allow the plaque to hang. I knotted the string at the front using the knots as a decorative element (a tip I picked up from fellow Gingersnapper Jo Capper-Sandon – thanks Jo!).

Monday, 15 March 2010

Tooting loudly!

I am sooooooooooooooooo excited to have been asked to be a part of the Gingersnaps Creations Design Team! Woooooo hoooooooooooooo!!!!

I am joining lots of very talented designers and I can tell you I am a little bit nervous about the whole thing. But I love a challenge so I think I am going to enjoy myself for the next six months :).

My first challenge is due 27th March so it'll be thinking cap on and stamps out next weekend!

Thanks so much to Shar and Ali for choosing me. You'll be seeing my creations and those of the other newbies from 1st April over on the challenge blog. If you've not seen Gingersnap before then pop over and take a look - their fun challenges are really laid back and open to interpretation, one of the reasons the team appealed to me.