Yes folks - it's true - pinch me! I made the incredible ColourArte Design Team much to my surprise and delight. I've known a little while but was sworn to total secrecy - boy has that been a hard secret to keep!
Here's the piece that I did as my entry for the callout - you can see the full step-out here.
I start my term in September and I cannot wait to start working more with ColourArte's gorgeous products (if they are not a brand you know take a look at their website and prepare to drool....).
I am among some very talented company on this team (no pressure then!) - you can meet the rest of the team over on the ColourArte blog today.
***HAPPY DANCE***
Katy xxx
Thursday, 30 July 2015
Wednesday, 29 July 2015
More Leftovers!
As promised another quickie with leftovers. This is becoming quite a fun habit and it's so easy to create something when you have a pile of goodies that already co-ordinate because they are left from something else. Today a really quick card made from the bits and pieces remaining after I created the below journal page. The background is literally made by lightly dragging an Archival inkpad over a piece of coated cardstock.
This was a guest DT make so full deets are on the Sprinkle of Imagination blog.
See you soon!
Katy x
Monday, 27 July 2015
Lovely Leftovers
Recently I've been making an effort to use the scraps on my desk when I finish a project and today's make is one of those creations.
This ATC was made from the bits and bobs left over from this project.
In planning for my card I stamped a whole load of images to use for the collaged elements on the cover. So I used those images to create the ATC above. The background is stamped with a postcard image and then simply layered with a variety of stamped images from Rubber Dance. Simple but I think quite effective.
I'll be sharing another leftovers make later this week :).
Thanks for visiting,
Katy x
I used these awesome Rubber Dance stamps:
Envelope Stamps
Vintage Postcard
Travel
Collage Elements 1
Friday, 24 July 2015
Tim's Tag July
Here's my version of Tim's Tag for July. I used two panels rather than three as I wanted to use larger stamps. I used Distress Inks in Pumice Stone, Black Soot, Broken China and Mermaid Lagoon for the painting and Antique China and Scattered Straw for the second layer of ink over the Distress Glaze.
My background is a page from an old A-Z map rather than patterned paper and I added a few splatters to tone it with the stamped panels. I used staples to add detail as I don't have a sewing machine.
Hope you like my version of the tag for this month!
Katy xxx
Thursday, 23 July 2015
Guest Appearance at A Sprinkle of Imagination
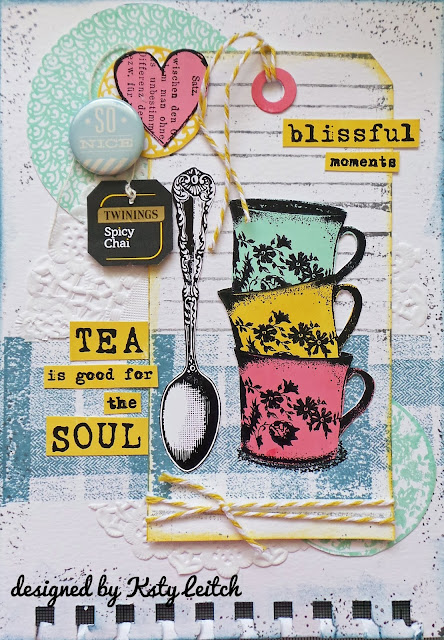
My second and last guest appearance for A Sprinkle of Imagination today - I've had such fun with the Finnabair stamps in creating my makes. Today I've tried to do something rather different with them, to show that grunge isn't the only way with these beautiful images. I made a fresh journal page celebrating the British love of tea.
Find out much more over at the Sprinkle of Imagination Blog today!
See you very soon,
Katy xxx
Monday, 20 July 2015
Noor! Design Team Application
Hello everyone! Today's post is my application to join the UK Noor! Design Team. I had to go for this one as they sell all the things I love - die cutters, cut outs, chipboard shapes, masks and stencils, stamps............. So many yummy treats! Although for this application I made a card (as per the rules), I hope I could bring a wide range of types of project to Noor! Design including mixed media, 3D makes and scrapbook pages.
Apologies in advance that I made a Christmas card in July but as so many companies are releasing their new Christmas goodies around about now, it seemed appropriate for this submission. I use die cuts on almost every project I make and this card is no exception!
To create it, I glittered white die cuts (Distress Glitter - Rock Candy) before layering them as shown onto an embossed kraft card panel flecked with white paint. I added flowers made from old music sheet, which I also glittered before placing as shown along with a Doobadoo bow. My 'winter' word is die cut in cream to tone with the flowers and to finish I added a few pearls enhance the vintage look. The card blank is 5x7 in size.
I used the following Noor! Design products to make my card:
- Joycrafts dies: Winter Wishes (2033), Ice Crystal Edge (2021), Crystal Die 3 (2020), 8 Point Die (0358)
- Dutch Doobadoo: Paper Art A5 Scattered Bows (017), Craft Art A5 Leaves (008)
I also need to add my social media links - friends if you don't follow me on these I'd love to see you there!
Fingers crossed!
See you soon,
Katy x
Sunday, 19 July 2015
Enjoy the Journey for Rubber Dance
My turn again for a step-by-step project over on the Rubber Dance blog! Today I made a card (for once), in the shape of a suitcase, as our Design Team theme this month is Travel & Vacation.
As usual, you can find steps for the techniques used over at Rubber Dance.
I am entering this into the Destinations Challenge over at A Vintage Journey, as it's very much Tim Holtz inspired!
Hope you like :)
Thanks for visiting,
Katy xxx
Here are the fabby Rubber Dance stamps I used. They are available from the webshop and international shipping is a flat rate, so why not pop over for a look?
Collage Elements 1
Envelope Stamps
Travel
Thursday, 16 July 2015
Sardine Shrine
I've been at the upcycling again today - inspired by a project I saw years ago by Gail Milburn (Efemera) which was made from a sardine tin. Advice suggests we feed our new doggie oily fish from time-to-time to make his coat shiny, so recently we've had sardine tins in the house - something we don't normally have because I think they are disgusting!!!
My make is a shrine to an inspirational woman and artist - the amazing Frida Kahlo. The stamp of Frida is by Stampotique - isn't she lovely? While conceiving this project I noticed that the current challenge at Our Creative Corner is Mexico Moods - so I used their moodboard, along with Frida's paintings, to inspire my colours.
I am entering lovely Frida into some challenges:
Our Creative Corner: Mexico Moods
Frilly and Funkie: Raise It Up (because the inside is layered with pieces of chipboard and it's literally raised up on a plinth!)
Simon Say Stamp Monday Challenge: Anything Goes
Here's a bit more info on how I made my piece for you.
My sardine tin is gessoed, then lightly coated with Viva Decor Terra Paste. Once dry I painted it a terracotta colour - reminiscent of Mexican pottery.
Inside the back of my shrine is a stamped skull (Tim Holtz) - linked to Frida's fascination with death. On top of this I built up a layer of stamped leaves and butterflies (Rubber Dance).
Frida Kahlo (Stampotique) is coloured with Distress Markers (her skin is darker on the piece - the light has bleached the colour a bit here). She has flowers in her hair (sprayed with Picked Raspberry Distress Spray), gemstone earrings and a butterfly and skull at her neck.
The stand is made of a cotton reel and a wood circle painted with DecoArt Metallic Paint in Gold (this paint is AMAZING - one coat and this coverage!) and aged with DecoArt Antiquing Cream in Black. The muse word is stamped onto card painted with the same Gold paint. The whole piece is finished with beads,
Finally a view of the side where you can see that I used the same method as for the base to create the golden wings and glued them to the back of the tin. I ran a length of lace all around the tin and added gold paint highlights with a dry brush. Frida is mounted inside on some layers of chipboard to bring her towards the front of the shrine.
I hope that my shrine is deserving of Frida - thanks for looking - I hope you like her.
Hope to see you soon,
Katy x
This isn't a DT make but my fave RD stamps still get a plug! I used these Rubber Dance stamps:
Twiggy Leaves
Antique Botanicals
Labels:
altering,
Deco Art,
Rubber Dance,
Sizzix,
Stampotique,
upcycling
Wednesday, 15 July 2015
Rubber Dance July Challenge Reminder
It's time for my mid-month Rubber Dance Challenge inspiration again. This month Bibi has shaken things up a bit and instead of a colour scheme you have a mood board to inspire you. Our optional theme is Travel & Vacation.
My creation is an ATC triptych using the travel theme. I started with three ATC-sized pieces of kraft card and joined them together, leaving a small gap between, with Idea-ology tape front and back.
I created my ATCs by first stamping the main images in Black Archival Ink then masking them and stamping backgrounds using the Vintage Postcard and hotel receipt stamps in Sepia Archival. I then added postage stamps and words in Cobalt Archival. I used permanent ink for my stamping as it doesn't run when you add wet media.
Finally I spritzed my ATCs lightly with Antique Linen Distress Spray Stain and heat dried the ink. Then I added a small amount of Blue Skies Glimmer Mist aiming towards the focal images in each case to further highlight them. Stick the ATCs to your background and you're done!
Best of luck in the challenge!
Am also entering this in the Country View Challenge July: Theme - On Your Travels
See you soon!
K x
Here are the rather lovely Rubber Dance stamps I used:
Travel
Envelope Stamps
Vintage Postcard
Monday, 13 July 2015
Blatant Bragging!!!
Saturday, 11 July 2015
For a Special Friend
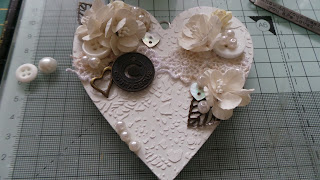
Today I am sharing a little gift I made for a friend who has been having a rough time and needed some cheering up! She loves blue so the colour scheme was a no-brainer! I think she liked it - anyway it raised a smile so that's all that matters.
I am entering my make into a couple of challenges as well:
Love to Create: Anything Mixed Media
That Craft Place: Anything Goes Mixed Media
Here's a few 'in progress' pics to give you an idea how I created this - by the way the wooden heart was from the wedding section at Hobbycraft and was very inexpensive.
Here's the heart in the planning stage - I've already used texture paste to create a raised pattern using a Tim Holtz stencil. I added my items with Soft Matte Gel (Prima) and left to dry.
Next a coat of white gesso then a coat of Broken China Distress Paint. I then added a further dry brushing of white gesso.
Add a sprinkling here and there with ColourArte Primary Elements pigment powders to create depth of colour. I spritzed them with water and heat dried before adding yet more gesso highlights. My final layer is a swipe here and there of Treasure Gold in Pewter.
And to finish, the addition of a Tim Holtz word plaque (I worked some white paint and Primary Elements into the recessed words), some seam binding dyed with Tumbled Glass Distress Ink and piece of similarly dyed lace to hang.
Hope you like - thanks again for popping in to see me!
Watch out for some blog candy coming soon ;)
Lots of love,
Katy x
Thursday, 9 July 2015
Guest Designer - A Sprinkle of Imagination
Super delighted to be guest designer again for A Sprinkle of Imagination today. I used gorgeous Finnabair stamps, available from their shop.
Hop on over to the Sprinkle of Imagination blog for all the info on this piece, I'll be guesting again towards the end of the month - can't wait!
Katy x
Monday, 6 July 2015
Rubber Dance Romance
Another romance-themed make from me today. No idea what has gotten into me - I think it must be weather! I've created a card for a change; not something I make all that often. I used lots of layers and a vintage style.
1 My background is Spun Sugar, Worn Lipstick and Abandoned Coral Distress Inks, overstamped with the Rubber Dance Flourishes background. Finally I added splats of Picket Fence (white) Distress Stain Spray.
2 The next layer is book page topped with a piece of vellum stamped and embossed in white using Rubber Dance's Lace background and trimmed with pinking shears.
3 My stamped image is called Retro Couple (one of my faves) and is stamped with Archival Potting Shed and loosely colour with dabs of Distress Ink (Worn Lipstick, Tea Dye, Walnut Stain).
4 Finally to embellish I used paper flowers, metal embellies and a stamped quote from the Rubber Dance set Collage Elements 2.
Hope you like my card - thanks for visiting me today!
Katy x
I used these awesome Rubber Dance stamps:
Retro Couple
Collage Elements 2
Lace
Flourishes
Subscribe to:
Comments (Atom)


