Monday 27 June 2016

Happy Birthday Janelle!


Wishing our team helper at Stampendous a very happy birthday - you rock Janelle! Thank you for all your support. Have a wonderful day!

The card I made for Janelle today is quite simple but I tried to keep the design elegant and feminine. The background is stamped with Dream Text in grey ink. I then added a strip of torn paper and splattered some watercolour paint in peach and pink. I stamped part of the Dream Text stamp again and cut out the 'celebrate' part to add to the bottom of the card.


The Angel Aviary image is coloured with Coloursoft pencils in a soft light palette. She's adhered to the card with 3D foam.

Katy x

I used these Stampendous stamps:


Friday 24 June 2016

Guest Designer at A Vintage Journey


Well I am amongst some prestigious company today! Absolutely delighed that Brenda asked me to be a guest at the A Vintage Journey challenge blog today.


The theme is 'Texture/Embossing Paste' and I've used several different mediums to add texture to my piece. There's an introduction to my project on the AVJ site and here are the full step outs of how I made it.

1) Paint a 6x4" canvas with DecoArt Cobalt Turquoise Hue paint diluted with Tinting Base. Use a scrunched up baby wipe to add patches of neat Cobalt Turquoise Hue, Cerulean Blue and white gesso here and there.

2) Stamp the Rubber Dance girl stamp onto white card (from my very own Take the Plunge set!). Stamp the sun (Tim Holtz) behind in two colours of Archival Ink. Stamp the girl a second time and colour with alcohol markers (mine are Graph It). Stamp the sun again in darker Archival colours. Cut out as shown.

3) Use a stencil (this one is Tando) and matte heavy gel to add some 'water' texture to the canvas towards the bottom.

4) Glue the sun rays and lady in place. Add scraps of cheesecloth to add more texture.

5) Mix embossing paste or modelling paste with paint to tint it - I used Yellow Oxide and Raw Umber DecoArt paints. Use the paste through a stencil (TCW) to make embellishments.

6) Add extra stencilling around the edges (TCW) - you can get texture with a heavy gesso by pouncing it through your stencil with a sponge.

7) Add a 'beach' using Texture Sand Paste from DecoArt. While still wet, add some Art Stones from Prima. When dry, tint with Transparent Yellow Iron Oxide paint.

8) Add a collage of pebbles and shells on the left. Glue the shell embellishment and stamped words to a piece of driftwood and add on the right to finish.

I really enjoyed creating this retro-themed piece, I hope you've enjoyed my adventures with texture today and hope to see you soon.

Katy x

Tuesday 21 June 2016

Disobeying the Rules!


Andy Skinner might have words with me about this post - I've been using (and abusing!) his fabulous DecoArt Media products in ways that they should not be again! Today, I present to you what not to do with Crackle Paste! And I LOVE LOVE LOVE the effect (sorry Andy!).

So the premise behind this project is that you're not really supposed to heat set Crackle Paste, so Mr Skinner says. So the small rebellious child in me wants to know WHY!? Here's why - it bubbles and blisters and pops and makes a stunningly grungy mess! Oh yes!


I originally pulled out the Crackle Paste for the latest Country View Crafts challenge - and I have used it, if not in the conventional way, so I am still entering!

Here's how I created my ATC:

1) Apply Crackle Paste through a stencil onto an ATC. You want a THIN layer - thick paste gives you big bubbles - to get the 'volcanic' texture you want lots of small to medium bubbles.
TIP: I used a chipboard ATC from Tando Creative - this background gets HOT and the chipboard base is much sturdier and able to take the abuse than paper or card. My stencil is from TCW.

2) Heat that sucker up - working while it's still wet. Hold the heat gun close to get lots of heat in there but move it around a bit so you don't scorch any areas. Continue heating until it stops making popping and cracking noises! (You have no idea how fun this is!!!!)

3) Paint with Cobalt Teal Hue, Blue Green Light and Green Gold paints, mixing a little. Work the paint into the texture. I also added some Metallic Lustre over the texture.

4) When dry, start to add interest to the background to highlight the texture. Use an Andy Skinner stamp with black permanent ink to stamp over the background. Add touches of orange paint in some of the cracks with a small brush. Dry brush the texture with black and then white gesso. Edge the ATC with black gesso,

5) I further added to the background with more touches of orange and some extra stamping in both black and white. I painted a piece of card in yellow mixed with a touch of orange and stamped the star (Dina Wakley) onto it. I then roughly sponged on some 'neat' orange paint to add texture. I finished the ATC with the stamped word. You'll need to adhere the star with hot glue or gel glue as the background is very lumpy and bumpy.

PS - I also tried this technique with gesso and it does work - but you don't get as dramatic an effect and you don't get the bubbles 'exploding' to make craters as the texture is more elastic/less brittle than working with the Crackle Paste.

I hope you've enjoyed my - ahem - experiments today! Thanks for stopping by.

Katy x


Products used:
DecoArt Media - Gesso White, Gesso Black, Crackle Paste
DecoArt Meda Fluid Acrylics - Cobalt Teal Hue, Green Gold, Cadmium Orange Hue, Hansa Yellow Light, Blue Green Light
DecoArt Metallic Lustre - Brilliant Turquoise
Stampendous Andy Skinner Stamp Set - Toxic
Dina Wakley Stamps (I don't know the name as I chucked the packet! But it's the star and word)
Black and white inkpads

Friday 17 June 2016

Stampendous Hop Fashionista Tag


All this week Stampendous are having a blog hop along with Nathalie Kalbach to showcase some of her gorgeous Stampendous stamps!

Here's your hop list for the last day of the hop:

There are three lucky commenters during the hop that will each win a prize package that includes all three of Nathalie Kalbach’s Foam, Cling Rubber and Stencil Stamp sets. This is open to everyoneTo be eligible comment on each blog post on the Stampendous blog and that of each designer’s blog post on the hop this week. Give a shout out to your place of residence, we want to see how far our hop goes around the world! We’ll announce winners on Monday June 20.
***

Hopefully all this week you've been enjoying our blog hop with Nathalie Kalbach and friends. Today I have a tutorial for you featuring Nathalie's Fashion Dame stamp set. This set comes with a lovely stencil which I've also used on this project.


Here's how I made it:

1) Cover a tag with pattered paper. Stamp the Fashion Dame image for placement. Add some elements cut from patterned paper and some washi tape.

2) Scrap yellow, pink and peach paint onto card with a credit card - when dry stamp the clothing onto the painted card and cut out.

3) Use the stencil that comes in the stamp set to add some areas of stencilled colour with Cantaloupe and Angel Pink inks.

4) Stamp the Dame again onto mixed media card, sponge her with Desert Sand ink on the skin areas and add some blush to her cheeks with Angel Pink and a Fantastix. Glue her to the tag over the image you stamped for placement then add the clothes.

5) Swipe the white ribbon with Cantaloupe and Angel Pink inks. Tie through the top of the tag. Ink the edges with London Fog ink.

To finish: Add a cluster of embellishments.some sequins and some word stickers to complete the tag.

I hope you like my tag. If you want to see more inspiration with Nathalie's stamps make sure you check out the Stampendous blog.

Thanks for visiting today - the whole Stampendous team hope you've enjoyed the hop this week. Don't forget to leave a comment for your chance to win some awesome stamps!

Katy x


Products used:
Stampendous products:
NKCRS07 Stampendous Nathalie Kalbach Fashion Dame Cling Stamp Set
STF082 Versafine Onyx Black Inkpad

Other products:
Tando Creative Chipboard Tall Tag
Memento Inks: Desert Sand, Angel Pink, Cantaloupe, London Fog
Yellow, pink and peach craft paints
Creative Impressions 3/4" white crepe ribbon
Fabscraps and Marion Smith patterned papers
Washi tape
Embellishments (e.g. buttons, snap, sequins, pins)

Thursday 16 June 2016

Stampendous Hop Birdie Journal Page


All this week Stampendous are having a blog hop along with Nathalie Kalbach to showcase some of her gorgeous Stampendous stamps!

Here's your hop list for today!

There are three lucky commenters during the hop that will each win a prize package that includes all three of Nathalie Kalbach’s Foam, Cling Rubber and Stencil Stamp sets. This is open to everyoneTo be eligible comment on each blog post on the Stampendous blog and that of each designer’s blog post on the hop this week. Give a shout out to your place of residence, we want to see how far our hop goes around the world! We’ll announce winners on Monday June 20.
***
Today I am sharing a journal page created with the Bird stamp set. I adore the sets that came out last year that have a cling stamp, a two-sided foam stamp and a stencil. as they have lots of creative possibilities. I also love that the stamps are BIG - I am not a fan of tiddy little stamps, especially when it comes to making journal pages.


Here's how I made it:

1 Create a background with Gelatos by blending blue. green and yellow shades. Take the stencil from the bird stamp set and sponge the paint from a DecoArt Mister in Yellow Green through the stencil.

2 Stamp the foam bird onto a scrap of patterned paper - stamp over in orange ink using the rubber bird stamp to create pattern (it doesn't matter if you go over the lines as you'll be cutting the stamp out). Cut him out and set aside for later.

3 Stamp the circle image onto the background in yellow and orange inks. Stamp the curved image in black for the bird to 'stand on' and stamp the edge of one of the other stamps around the edge. 

4 Splatter with page with black paint. Add some circles stamped in white gesso with bottle lids and some smears of gesso and orange Gelato on the edges.

5 Finish the page by adding the birdie and a printed quote.


Hope you like my happy journal page! Enjoy hopping this week.

Katy xxx

Products used:
Stampendous products:

NKCFS02 Stampendous Nathalie Kalbach NK Studio Bird Foam and Cling stamp and Stencil
NKCRS05 Stampendous Nathalie Kalbach NK Studio Kaffee Klatsch
NKCRS04 Stampendous Nathalie Kalbach NK Studio Fiesta

Other products:
DecoArt Media Mister - Yellow Green
Black acrylic paint
Faber-Castell Gelatos

Scrap of patterned paper (from my scraps box so I don't know the brand!)
Inkpads in black, yellow and orange


Tuesday 14 June 2016

Stampendous Nathalie Kalbach Hop - Elephants on Parade!


All this week Stampendous are having a blog hop along with Nathalie Kalbach to showcase some of her gorgeous Stampendous stamps!

Here's todays hop list:

Katy Leitch - you are here!
There are three lucky commenters during the hop that will each win a prize package that includes all three of Nathalie Kalbach’s Foam, Cling Rubber and Stencil Stamp sets. This is open to everyoneTo be eligible comment on each blog post on the Stampendous blog and that of each designer’s blog post on the hop this week. Give a shout out to your place of residence, we want to see how far our hop goes around the world! We’ll announce winners on Monday June 20.
***

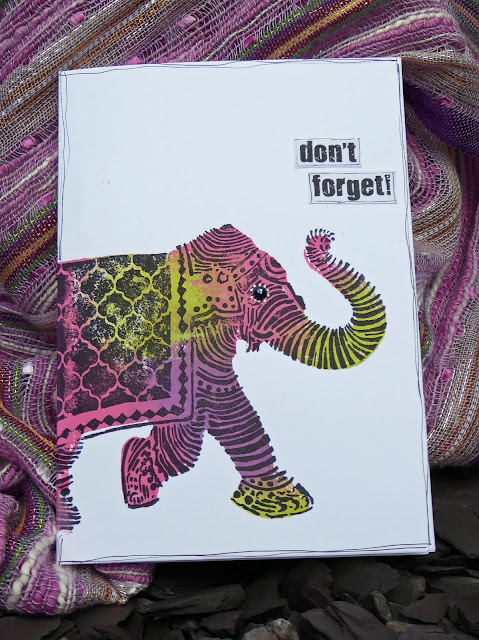
So for the hop today I've been having some fun with Nathalie Kalbach's Elephant stamp set (the set contains a foam stamp, a cling stamp and a stencil) - what a cutie he is!!! I've created two cards which are quite different - one clean and simple, one lush and richly decorated.

The above card was created very simply - I sponged the plain side of the foam stamp with three colours of paint before stamping the image on a white card blank. I then stamped the cling image over the top in black ink. The card is simply finished with a printed greeting, doodled border and gemstone eye.


My second card was inspired by the colours of Indian fabrics. My background is created by painting ColourArte Silks in three colours over a piece of Mixed Media card. When dry I stencilled over with Radiant Gels (which is a thick lustrous gel). I used the stencil from the set for this.

I then stamped the elephant onto purple cardstock with Versamark and embossed him with Pirate Gold embossing powder, before applying him to the card with 3D foam tape.

Finally I edged the card with purple paint and added a little shadowing beneath the elephant with charcoal pencil.

Hope you love heffalump as much as me!

Katy x


Products used:
Stampendous products:

NKCFS01 Nathalie Kalbach Elephant Foam, Cling and Stencil set
EP102 Stampendous Metallic Embossing Powder Pirate Gold

Other:
Card 1:
White 5x7" card blank
Pink, purple and lime acrylic paints
Black gemstone
Black inkpad
Black fineline pen
White gel pen

Card 2:
ColourArte Silks - Mango Mamba, Spiced Pumpkin, Solar Gold
ColourArte Radiant Gel - African Jade
My Colors cardstock - Grape Vine
DecoArt Media Fluid Acrylics - Dioxazine Purple
Gold gem
3D foam tape


Wednesday 8 June 2016

Creative Chemistry 101


So I decided to go ahead and sign up for Tim's Summer of Creative Chemistry programme. I wasn't sure if it was for me as I am quite experienced with Distress products but so far I am enjoying the prompts and revisiting some of my favourite products (plus Tim's videos are quite soothing to listen to!).

Colours: Abandoned Coral, Mustard Seed, Spiced Pumpkin, Aged Mahogany, Fossilized Amber, Walnut Stain
Stamps are Tim Holtz and PaperArtsy

Colours: Mustard Seed, Picked Raspberry, Seedless Preserves
Stamps are Stampendous and PaperArtsy

Colours: Salty Ocean, Broken China, Squeezed Lemonade, Cracked Pistachio, Evergreen Bough, Peacock Feathers, Vintage Photo, Mustard Seed, Fossilized Amber, Spiced Pumpkin
Stamps are Tim Holtz

These tags are from the first lesson - a) water spritz, b) watercolour stamping and c) good old wrinkle free distress. They took me less than half an hour per tag so I am hoping this exercise will get the old mojo going again!

More to follow (well hopefully, you know I only made it to about April with the tags right? LOL).

Katy x