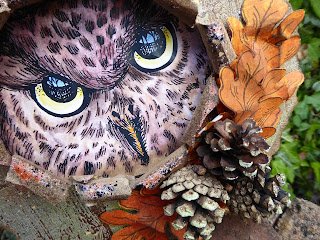
For this week's fall theme at Stampendous, I'm sharing a piece I created for the catalogue with this fantastic owl stamp. He's peeking at you through a hole in a tree!
Here's how I made my piece:
1 Stamp the owl and colour with Inktense pencils or your
choice of medium. Cut out, ink the edges brown to hide any white areas and mat
onto a larger piece of dark brown cardstock.
2 Stamp the wood stamp onto a piece of mid-brown cardstock
repeatedly with Versamark (or embossing ink of your choice) and cover with
Nutmeg powder. Sprinkle some Lettuce powder here and there to simulate moss
growing on the wood. Heat emboss the powders.
3 Draw around a circular object (e.g. a plate) onto the
cardstock to create the outer edge of the circular frame – judge the size by
the size of the stamped image. Tear out the shape roughly.
4 Use a small circular object to draw a rough circle in the
middle of the cardstock from step 2. You only need a small circle as it will
get bigger as you tear. Make a small cut along your drawn line to get you
started then tear out the shape of the hole roughly.
5 Tear and fold back the edges of the circle from step 3 to
form a 3D aperture. Use a brown spray ink over to add additional speckled
texture, if desired.
6 Carefully sprinkle a few random areas of Spoonful of Rust
powder to add texture – you don’t want too much – just some subtle areas of
texture. Heat from beneath to melt (I found that with my heat gun, which is one
of the more open ended ‘hairdryer’ style guns, I could gently heat from above
too and not blow the powder away).
7 Stamp some leaves and spray with orange spray ink to
colour. Crumple up then flatten out again and swipe a brown inkpad lightly over
to pick up the texture. Glue in place with a gel or silicone glue to enable
them to retain their dimension.
8 Press the pinecones randomly onto a Versamark pad.
Sprinkle with Lettuce embossing powder and heat to set, to give them greenish
tones in places. Glue in place with gel or silicone adhesive, or a hot glue
gun.
9 Cut another circle of corrugated card or similar thick
cardstock (I used an old box) and glue the owl image to it, lining the image up
with the aperture in the frame. Apply the card circle to the back of the frame
using spacers to give it a 3D look – I used pieces of foam board sandwiched
between 3D foam tape, but you could easily use more corrugated card pieces.
Products used:
Stampendous products:
CRR268 Look Into My Eyes Stampendous Cling Stamp
CRS5052 Jumbo Leaves Stampendous Cling Stamp Set
CRR249 Wood Background Stampendous Cling Stamp
EP512 Stampedous Opaque Embossing Powder – Lettuce
EP504 Stampedous Opaque Embossing Powder – Nutmeg
EJS05 Spoonful Rust
MPW811 Mixed Media Paper
WA101 Versamark Watermark Ink Pad
Other:Cardstock – white, dark brown, mid brown
Thick cardboard (I recycled a packing box)
Derwent Inktense Pencils
Brown and orange ink spray
Brown inkpad
Gel or silicone adhesive
3D foam tape
Thanks so much for stopping by :)
Katy x
Thick cardboard (I recycled a packing box)
Derwent Inktense Pencils
Brown and orange ink spray
Brown inkpad
Gel or silicone adhesive
3D foam tape
Thanks so much for stopping by :)
Katy x


Fantastic card. Love how you put owl in a tree hole. Super!!!
ReplyDeleteMarjeta
Fantastic card. Love how you put owl in a tree hole. Super!!!
ReplyDeleteMarjeta
Gorgeous piece katy .. that owl is awesome xx
ReplyDeleteA stunning piece of art Katy - love the techniques you've used. Shabneez x
ReplyDeleteYes - the owl is totally AWESOME and so is the wood around him. This is just so fun Katy. Love every inch of it. Makes me want cooler weather even more!!! Xj.
ReplyDeleteThis is brilliant..I love it.
ReplyDeleteLuv CHRISSYxx
This is wonderful!
ReplyDeleteOH MY GOODNESS!! This owl is marvelous!! At first it looks like a photograph of a real owl!!! Absolutely amazing!!! Love how he is looking out the tree hole!!! TFS!
ReplyDeleteOMG how cool is that ... the owl peeking out; the edges awesome touch !
ReplyDeleteOh wow! This are such interesting projects. Love them, specially the altered book.
ReplyDeletecheers,
Aurora